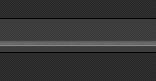
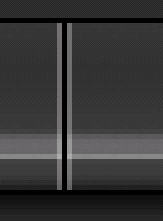
Open a new document, File>New and I set my deminsions 400X400. If you were
wanting to go ahead and make this a standard web page size, just set yours to
778X600. Now when you have that document open, using the paint bucket tool,
fill your back ground layer with #2d2d2d. This isn't necissary, but it gives
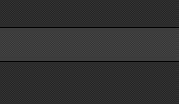
our image a nice dark background to work on. Now create a new layer above
that and then using your rectangle marquee tool draw out a horizontal
selection. Make this sorta thick because we are going to add perspective to
it. Now fill it with #3d3d3d then click the little 'f' and select 'Stroke'. Apply a 1 pixel, black
inside stroke. Press Ctrl+D to deselect. Your image should resemble mine:
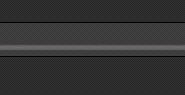
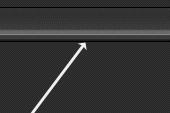
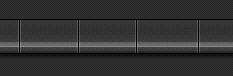
2. Now grab your dodge tool. Make sure your on the layer we just drew the
nav bar on. Set your brush tip size to a 5 pixel hard round,
Range:Highlights, Exposure:100. Now make one swipe horizontally across the
mid bottom section. Now set your dodge tool to a 1 pixel tip and then make 2
swipes across the bottom part of where we just dodged.(Note: This is not an
exact science, so feel free to experiment). Now you should see your nav bar
starting to take a perspective. Pretty cool huh?
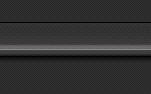
3. Now grab your burn tool and about a 9 pixel soft brush. Range: Midtones,
Exposure: 50% and burn a little on the bottom part of the nav
menu. Now set
your brush to about a 21 or so pixel soft brush and set your Exposure to 10%
for your burn tool and burn a little bit on the back part of your nav(top
half of your nav). Don't over do it, just a subtle touch is fine. If you
would like to add a little dropshadow to your image now that will be fine.
Just click the little 'f' and select dropshadow. Apply it to your liking.
Now, you should have something that resembles mine. It probally won't be
exactly like is considering i can't click your mouse for you. :P
4. Ok, now lets add some insets, create a new layer above the rest of your
layers and grab your pencil tool, set the tip to 1 pixel and color to black.
Now start creating your vertical lines, cutting out your buttons. Don't be
afraid to zoom in! Get up close, it won't hurt. Hold shift to draw a
straight line with the pencil tool. Now once you get your buttons chisled
out like you want them, create a new layer above that and set your pencil
tool to a 1 pt , white color and opacity: 30%. Now draw on the outside of
each black line you just made. And lastly, set the layers blend mode to soft
light and duplicate it once.
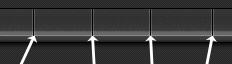
5. Now were getting closer. Go back to your original nav bar layer and
select your dodge tool again. Set it to about a 9 pixel soft brush and dodge
the front corners of where two buttons meet (Did I loose you? Check the
image). Then start
lightly dodgeing blotches around and over yoru
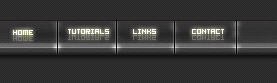
insets. Now add your text, anything you wish... I did a nifty little
reflection effect. You cand find relection tutorials all over the net so i
won't bother with how i did that. Also i burned a little bit behind my text
to represent shadows coming off the text. And, guess what? Thats it! Hope
you enjoyed.