| I was trying to reproduce a cool water effect I saw on the web one day, and this was the result. It turned out to be a pretty useful technique actually. In addition with using it for image backgrounds, this texture make a great reflection map for more complicated works such as chrome objects. |
|
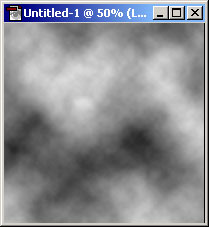 |
1.Start by opening Photoshop and creating a new image. For this example, I chose dimensions of 400x400 pixels. (Note that all example images in this tutorial are scaled down by 50% and can be enlarged to full size if you click them). Hit D to set your colors to default: black as foreground and white as background. Go to Filter>Render>Clouds to make what will be the base of our water texture
|
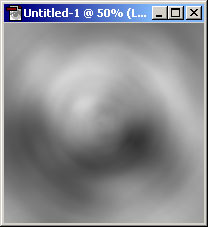 |
2.Now go to Filter>Blur>Radial Blur and use these settings - Amount: 38, Blur Method: Spin, Quality: Good (unless you don't mind waiting a little bit (I didn't), in that case choose Best). Then go to Filter>Blur>Gaussian Blur with a radius of 2 because we want this to be blurry to the max.
|
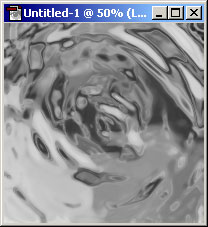 |
3.Go to Filter>Sketch>Bas Relief and choose the settings - Detail: 13, Smoothness 10. Next go to Filter>Sketch>Chrome and select the following options - Detail: 5, Smoothness 2.
|
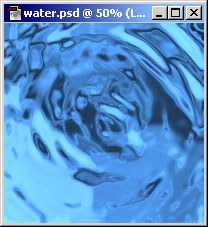 |
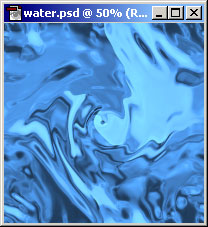
4.Ok time to try to color in this masterpiece of wetness. There are an infinite number of ways you could go about doing this, so I'll just show you the general method I followed. Duplicate the layer by going to the Layers palette and dragging the layer with the water texture onto  Image>Adjust>Channel Mixer. You may want to make it a different color, but to copy the blue I used make these changes - in the Red Output Channel move the blue to the left; in the Green Output Channel move the green slightly to the right; in the Blue Output Channel move the blue to the right. Next click on the Image>Adjust>Channel Mixer. You may want to make it a different color, but to copy the blue I used make these changes - in the Red Output Channel move the blue to the left; in the Green Output Channel move the green slightly to the right; in the Blue Output Channel move the blue to the right. Next click on the  Curves of the lowest layer (click it and hit Ctrl/M). Curves of the lowest layer (click it and hit Ctrl/M).
|
 |
5.Well, now you have a pretty decent-looking water texture. You would be done if this was merely a water texture tutorial, but this is a seamless water texture tutorial. First make sure you save your file. Then flatten your layers by going Layer>Flatten Image. Next go Filter>Other>Offset. Fill in the coordinates - Horizontal: 200, Vertical: 200. After that, go Filter>Distort>Twirl select 120° as the angle. Now you may be done here if you like the way it looks, but I had a poor turn out on this example - the four sections were still clearly visible. So to correct this simply add one more filter. Go Filter>Distort>ZigZag and choose - Amount: 10, Ridges: 5, Pond Ripples. That should do the trick, and you will end up with a perfectly seamless water texture. Just for fun, you may want to see your image in seamless-tiling glory. Hit Ctrl/A to select all, then go to Edit>Define Pattern. Create a new image (about 800x800 pixels), click the paint bucket, set Contents to Pattern in the Options palette, and click in your blank image. You can click the image to the left to see my example looks. Refreshing, eh?!
|

|
Water textures have been known to make stell |


