Welcome to the Creating Views tutorial . This tutorial was designed to teach you how to make your navigation more convenient by creating views. If you need help with it, or find it confusing, don't hesitate to e-mail me, the information is at the bottom of the page.
1 Views are simply saved magnification levels, and they're very easy, and very useful for those large projects.
Let's say you were creating a logo for some company, we'll use the logo to the left as an example. Let's say you will be adding a bit more to this logo in the future, but want to commence the layout creation. You know you will be reverting back to the logo and making adjustments numerous time in the future. To avoid zooming in every time, what should you do?

Solution: Create a View!
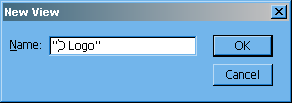
2 All you'll need to do is find your magnification level using the Zoom Tool (). Once you have the perfect view, choose Views>New View , choose a name for the view and press OK .
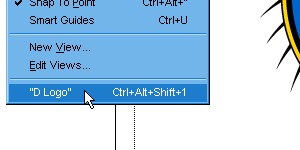
3 As soon as you want to revert back to your saved view just choose it from the View pull-down in the main menu. You can also edit the view here.
Like I said creating views are simple, and it may seem bizarre to make a fuss about something so simple with a tutorial, you'll be surprised how much you'll use Views in the future.
Congrats, you're done!
<!-- ARTICLE CONTENT STOP -->


