There are many ways to create artistic brushes for use in the Adobe® Illustrator® 9.0 Brushes palette. The easiest, of course, is to load the Artistic Brushes Libraries found on the application CD. There you will find quite a selection of artistic brushes. Read no further if you found the brush you need. But, for those of you who might like to customize a brush a bit more, read on. In this tip we will learn how to use Adobe® Photoshop® brushes and paths to create a more organic-looking brush to use in Illustrator.

1. Open a new file:
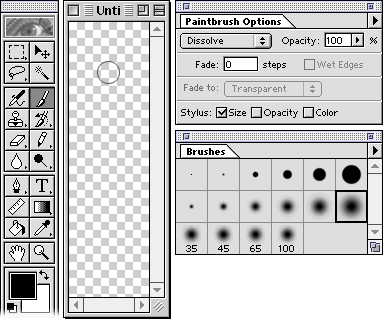
Launch Photoshop, and open a new file roughly 80 x 275 pixels, 72ppi, with a transparent background.
2. Set paintbrush tool options:
Select the paintbrush tool. In the paintbrush options, make sure the mode is Dissolve (this will give us a rougher edge), 100% opacity, and no fade. If you have a stylus, Size should be checked. (In this next step it's helpful to have a stylus to give you more flexibility with pressure sensitivity.) Show the Brushes palette, and select a medium feathered brush.
In the Display and Cursors preferences, you can set how you would like your cursor to view. In this example, we've selected Painting Cursors to view as Brush Size.
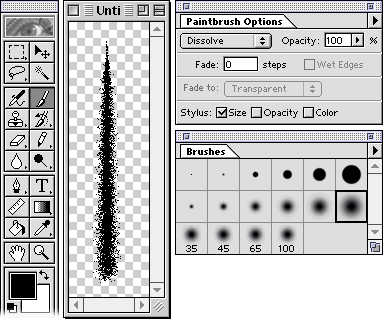
3. Draw a stroke
Make sure your colors are set to default black and white by pressing the D key. Next, while holding down the Shift key, drag to draw a straight line. Remember, if you are using a stylus, you may want to vary the pressure to get thick and thin strokes. Now, this stroke might be just as you'd like, but we're going to finesse it a bit to obtain a charcoal look once it's back in Illustrator.
It's best to create a straight brush, so that when it's applied along a curve path, it will follow the path precisely.
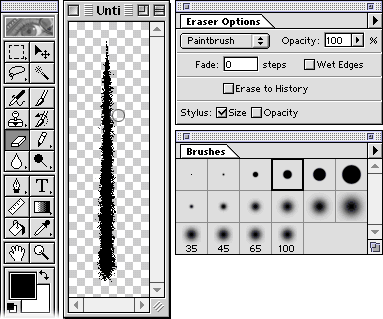
4. Change the shape of the stroke:
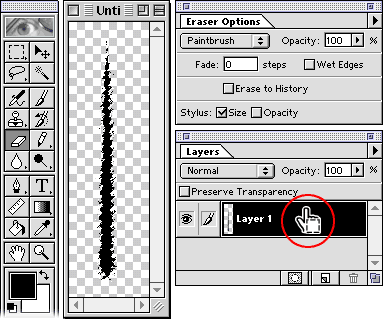
Experiment with different brush sizes and types as you continue drawing on top of your stroke to manipulate the shape. We've even used the eraser tool to erase away color and help form the contour of the brush. Every pixel does not have to be perfect at this point.
5. Create a selection:
Once you have the brush pretty much as you would like (and believe me, you will be experimenting more once you get familiar with how this image translates to Illustrator art), stop drawing and continue with the next step. In the Layers palette, Command-click (Mac OS) or Ctrl-click (Windows) the active layer to create a selection around your art.
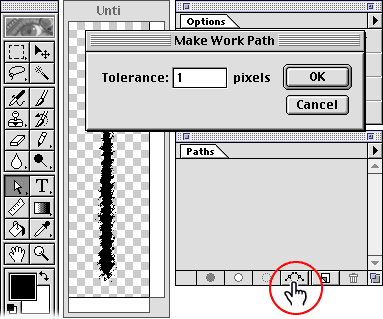
6. Make a work path:
Switch to the Paths palette. Here we will transform the selection into a path. Option-click (Mac OS) or Alt-click (Windows) on the Make Work Path From Selection icon at the bottom of the palette. Enter 1 pixel so that the path will follow closely to your selection. Click OK to create your work path. With the direct selection tool, select the path and copy it (Command/Ctrl+C).
A work path must be saved, or it will be overwritten the next time you create a path. Double-click the work path to save it as a path for use later. The tolerance amount can be between 0.5-10 pixels. At 0.5, the path will try to follow the selection the best it can, and at 10, it will be a much looser interpretation of the selection.
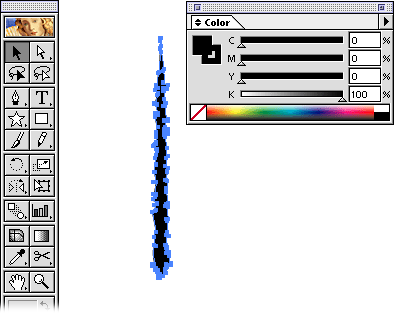
7. Paste the stroke into Illustrator:
Launch Illustrator, and then paste (Command/Ctrl+V) the path into a new document. The path comes in filled and stroked with None, so fill the object with black. And there you have it - art for your brush. Now, of course, you can do some more finessing if you like by moving anchor points or using the smooth tool to delete points, but I'm going to move on and make this art a brush.
Unless you know exactly what color you always want the brush to be, color it black. Then, in the tool options, select a Colorization method of Tints. This makes the brush take on whatever stroke color you have selected.
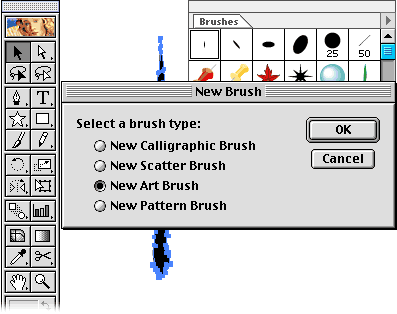
8. Create a new brush:
Select the art, and drag it onto the Brushes palette, or choose New Brush from the Brushes palette menu. In the next dialog box, select New Art Brush. The Art Brush Options dialog box appears. Set up your options by choosing a Colorization method of Tints. Now you are ready to use the new brush! You might want to do some more editing on the brush, in which case you can go back to Photoshop, or just edit it in Illustrator.