Infuse your work with a high-tech, yet organic look by learning how to make this relatively easy shape. By learning how to create the shape in this tutorial, you can go on to create illustrations like this; with the help of some Photoshop filters.
1. Create four circles with the ellipse tool
Create four circles, spaced evenly apart both vercially and horizontally. Try not to space them too far apart; a 1/4 inch would be the maximum. Take advantage of the ALIGN palette (WINDOW > SHOW ALIGN), if necessary, to help you get the spacing just right. It's best to work with stroked circles rather than filled shapes.

Before going further, and to save yourself some trouble, copy one of the circles and put it on a different layer for later use with your completed shape.
2. Delete path sections
For the top-left and lower-right circles, I used the Direct Selection tool to delete the greyed-out portions of the circles. The remaining arcs will serve as the join paths for the two circles.

3. Shape & position the arcs
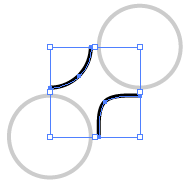
With the selection tool, select the arcs and add anchor points (OBJECT > PATH > ADD ANCHOR POINTS). This will add one anchor point to the middle of each arc path. With the middle anchor point selected on one of the arcs (example shows the lower-right arc), use your arrow keys and press UP then LEFT three times. Repeat the process for the other arc (using DOWN then RIGHT). The result is a tighter arc to work with.

4. Position arcs
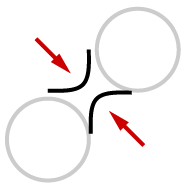
Now that we've shaped the arcs, we need to move them into position so that we can join them with the two circles. To do this, I relied on the arrow keys again. Using the Selection Tool, I selected the lower-right arc, and pressed UP then LEFT three times and repeated the process for the other arc (using DOWN then RIGHT). Note in the example below that the lines I've moved are not directly on top of the circles. Fear not, we'll get to that shortly.

5. Delete paths on circles
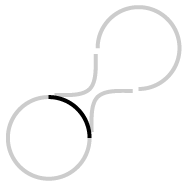
For the two remaining circles, we need to delete part of the path on each. With the Direct Selection tool, I selected the part of each circle that comes between our two arc paths. In the image below, I've deleted one path already and show the other path in black that I'm about to delete.

6. Average and join points
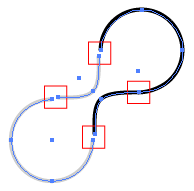
We now need to overlap our anchor/endpoints from the arcs and circles. Using the trusty Direct Selection tool, select an endpoint on an arc and the closest endpoint on the circle and use the AVERAGE command (OBJECT > PATH > AVERAGE). Select BOTH when asked for the AXIS from the AVERAGE command. Since the averaged anchorpoints are still selected, let's join them using the JOIN command (OBJECT > PATH > JOIN) and choose SMOOTH when asked to join the points. Repeat these steps for the remaining three gaps.

7. Remove outline; fill your blob
Your last step is voluntary. You can either remove the stroke and fill your shape or leave the stroke on and do what you wish. You can also bring back your circle from Step 1 and reverse your shape for all sorts of wackiness.


