By Jennifer Alspach
 Illustrator¡¯s Art Brush is truly a multiple use tool. Sure you can choose from calligraphic or hand-drawn brush effects, but don¡¯t stop there. Found under Window>Brush Libraries (or from the Brushes palette¡¯s flyout menu) are Arrows, Artistic, Decorative, and Border brush styles, too. Illustrator also lets you create your own brush and save it with the other brush presets.
But even though the Art Brush looks like a brush and acts like a brush, beneath those bristly edges hides a one-stroke image tool. Not quite with me? Let me explain. The traditional way to create multiple objects is to draw the object first, then copy and paste that object and transform the pasted object to make it larger or smaller. Drawing this way is fine. However, it can be time-consuming.
Instead, you can create a bunch of objects easily using the Art Brush. For this example, I¡¯m going to make a bunch of mice. Draw a mouse with the Paintbrush tool or use Live Trace. Using Live Trace can cut the drawing time of any object down considerably. You can scan a few photographs and convert them to paths with the Live Trace tool. Edit these paths using the Direct Selection tool. I like to Group the object just to keep all of the parts together. Or, for you more traditional artists, draw the object using the Pen tool. Remember, when you fill the shapes with color, you cannot use gradients, gradient mesh, or blends. Don¡¯t let that stop you from trying this technique. You can create pretty cool-looking objects using solid fills and varying the color to create shadows and highlights.
To create a mouse Art Brush:
|
|
| STEP 1 |
|
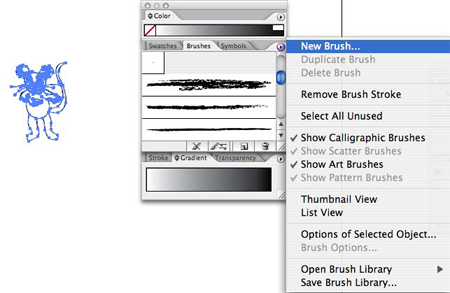
| With the Selection tool, select the mouse and choose New Brush from the Brushes palette¡¯s (Window>Brushes) flyout menu, or simply drag the mouse art over the Brushes palette. The New Brush dialog will pop up. |
|
|
| STEP 2 |
|
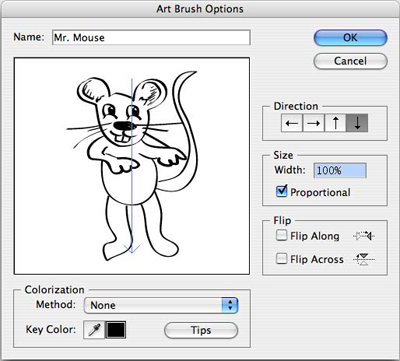
| Choose Art Brush as your type of brush. In the Art Brush Options dialog, be sure to check the Proportional checkbox or your mice will be out of sorts. Choose the direction in which you best draw. I tend to draw from top to bottom, so I chose the last arrow direction. |
|
|
| STEP 3 |
|
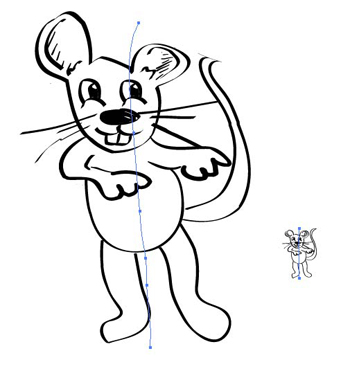
| When you click OK, you can start using the Paintbrush tool with this new brush. The brush you just created will be the active brush. The longer strokes will make larger mice, and smaller strokes make smaller mice. Now you can paint a menagerie of mice by the stroke of a brush. |
|
|
| STEP 4 |
|
| Have some fun with it: try curving the line, going sideways, or making a wiggly line. |
|
|
| STEP 5 |
|
| To take the mouse a step further, drag a copy of the mouse from the Brushes palette and drop it onto the page. Select the mouse and then use the Rotate tool (R) to rotate the mouse so it¡¯s upright. Using the Live Paint Bucket tool (K), click on the mouse to make it a live paint group, select a Fill color, and fill in the mouse with color. |
|
|
| STEP 6 |
|
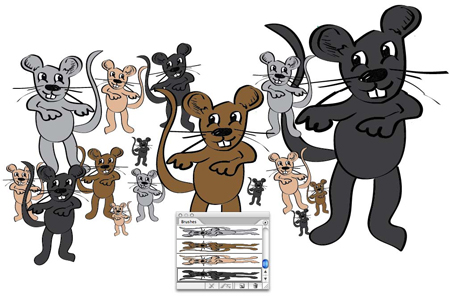
| Press Command-Option (PC: Control-Alt) and click-and-drag to copy another mouse. Use the Live Paint Bucket tool to make the new mouse a different color and so on. Using the Reflect tool (O), change the positioning of a mouse or two. Take each of the new mice one by one and make them into an Art Brush. Now you can create a field of a variety of colored mice. |
The Live Paint option lets you very quickly colorize any drawn objects, especially ones without closed paths. A really amazing thing about using the Art Brush is that the file will be so much smaller because it only records one actual object where copying and pasting creates multiple objects resulting in a much larger file size. Not only can you create your own brushes, but you can also use the various default brush styles to apply to your artwork for a hand-drawn flair. To apply a different brush automatically, you can select the object first and then click a brush in the Brushes palette. This image here shows a house in the upper left as it was originally and then with a variety of brush strokes applied.