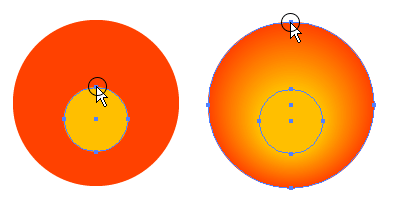
1. Create the circle paths
First create a circle path and fill it with orange color. Then
Copy (
Ctrl+C) it and
Paste in Front (
Ctrl+F). Scale down about 40% and drag it slight below the center point of the orange circle.

2. Blend Tool
Select the
Blend Tool 
, click on the top edge of the yellow circle and then click again on the top edge of the orange circle. Or you can blend them by selecting both circles, go to
Object > Blend > Make (
Ctrl+Alt+B).

3. Add final light reflection
Make an oval path and fill it with black & white
Gradient and place it on top of the circles. Note if your color setting is CMYK, make sure the black for the gradient is full black(C=100, M=100, Y=100, K=100). With the oval path selected, go to
Transparency pallate, select
Screen Blend Mode. If your
Transparency is not showing, go to
Window > Transparency or press
Ctrl+Shift+F10.

Advantages
There are serveral advantages to create this glassy button with
Illustrator than
Photoshop:
- It is vector, which mean it is scalable.
- It is easier and faster to make this with Illustrator (less steps).
- Easier to change colors, just need to fill the circles with different colors.

<!-- #BeginLibraryItem "/Library/tutorial_comments.lbi" -->


 Download Source File (.ai)
 , click on the top edge of the yellow circle and then click again on the top edge of the orange circle. Or you can blend them by selecting both circles, go to Object > Blend > Make (Ctrl+Alt+B).


 <!-- #BeginLibraryItem "/Library/tutorial_comments.lbi" -->


