3D Text in photoshop
[ 作者来源:celoxdesign.net
编辑整理:
PhotoShop资源网
更新时间: 2006-10-11
录入: 黄叶飞扬 ]
Step 1:
Make a new file with 600px width and 300px height, and with #51676b as background color, you can change this when making the new file.
Type in your preferred text, I used a default font so you won’t have to download anything making this tutorial, the font I used is "Impact" which is available on all windows installations.
I used color #33515e for the text, I advice you to use the same colors as me to get the same effect, after the tutorial it’s wise to experiment with different colors and some minor changes to the effect.

Step 2:
Rasterize the layer, right click text layer in layers window > Rasterize layer. Now we can perspective the layer, without rasterizing we can’t do a perspective on text.
> Edit > Transform > perspective, then go to the top right corner box and drag it to the middle top, the effect we want with this is to have a small back and bigger front so it looks more 3d in the end. Also try to drag the other 3 corners if you don’t get the similar effect to me which is shown below:

Step 3:
Now we’re going to make the base that’s going under the the main text layer, the 3d look which we’ll see in the end result.
Make sure you got the text layer selected in the layers window, then HOLD alt on your keyboard and press the up arrow on your keyboard 10 times. Holding alt and pressing an arrow key makes a new layer and moves it 1 pixel in this case up.
Right click Layer copy 5 > Blending options // "Layer is the name of the layer, in my case it’s Celox."
And change the color overlay to:


Step 4:
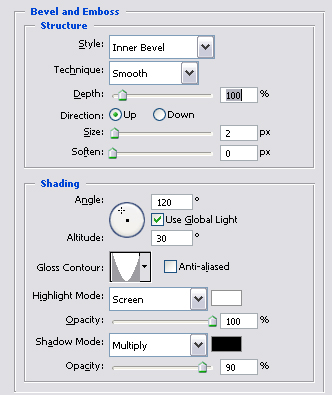
Right click Layer copy 10 > Blending options, check Bevel and Emboss, and Color overlay then change the settings below:


Step 5:
Duplicate the lowest text layer in the layers window, photoshop automaticly selects the duplicated layer but we don’t need that one, select the layer beneath it.
Go to Filter > Blur > Motion blur, and use an angle of 90 degrees, and distance 30 pixels, hit OK.

Group all the text layers in one group, name the group Text layers, if you don’t know how to make groups follow this tutorial
Step 6:
Make a new layer outside the Text layers group, name this layer brushing, take a 210px brush size and a soft brush, set foreground to white (Hit D on your keyboard, then X).
Then brush the sides of the text a bit and some corners, but beware don’t brush to much!
My text with brushing:

Make a shine and a star, If you don’t know how to just ask in the comments or shoutbox! They are very simple and I will explain it to you if you ask nicely ;).
My end result:

≡★ 免 责 声 明 ★≡
除本站原创外,本站所提供的所有教程均收集整理自网络,其版权归该教程直原始作者或原始出处所有!
除特别声明外,您可以在保持教程的完整和注明来源的前提下免费复制、转贴本站所提供的所有教程;但是,不可以盗链本站的图片!
除特别声明外,在未经许可的情况下您不得将本站所提供的任何教程(包括资源)用于商业用途;
如果确有需要,请自行与该教程的原始所有权者(即:原始作者或出处)联系,本站不提供相关服务;否则,由此而引发的一切后果由您自负!


