ILLUSTRATOR'S BRUSHES are an illustrator's dream. They combine the ability to draw variable, freehand brushstrokes or apply a pattern or objects to a path with all the advantages of vector graphics - i.e. small file sizes, resizability, and crisp output. To new users, however, they can be a little confusing. If you have followed our Introduction to
Illustrator and need to learn a little more about basic brush functions, then you have definitely come to the right place!
|
 Overview Overview
There are two ways to work with the brushes: Choose the Paintbrush-tool & a brush and draw a shape right away with a brushstroke built-in, or apply a brushstroke to an existing path.
To change the contour of a brushstroke, you can use any tool or command you'd normally use to reshape a path (Reshape, Pencil, Smooth, Erase, Add-anchor-point, Convert-anchor-point, etc.).
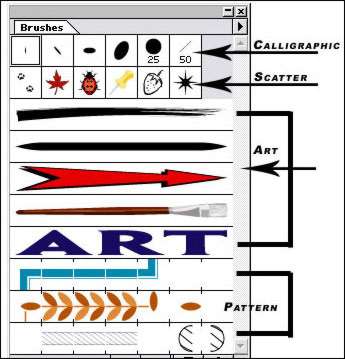
Brushes come in four flavours: scatter, calligraphic, art, and pattern. They are stored on and accessed from the Brushes palette. The brushes that are currently on the Brushes palette save with the document. If you modify a brush that was applied to any existing paths in a document, you'll be given the option via the Brush Change Alert dialog box to update those paths with the revised brush. To update those paths click the triangle located at the top of the Brushes palette and select Brush Options. You can now update the paths and/or create your own brush(es). The brush dialog box on your screen 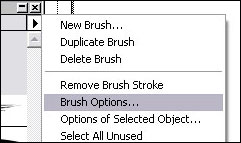 will depend on the type of brush you have selected to change/create. Take the time to familiarize yourself with the options, play with the sliders, and watch as your brush changes with the selections you make. will depend on the type of brush you have selected to change/create. Take the time to familiarize yourself with the options, play with the sliders, and watch as your brush changes with the selections you make.
When you have made your final changes, click OK. The next pop-up is the Brush Change dialog box. The choices are Apply to Strokes, Leave Strokes, or Cancel. This alert gives you the option to change your mind before finalizing the brush.
|
|
To Draw With The Paintbrush-Tool
 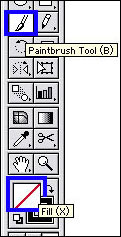 Choose the Paintbrush-tool and choose a fill of None (i.e. as in the image on the left). Choose the Paintbrush-tool and choose a fill of None (i.e. as in the image on the left).
If your Brush palette is not open go ahead and open it now by selecting Window > Show Brushes and click on a brush type.
Draw on your artboard with the brush. I selected the Fall Leaf.
A path created with the Paintbrush-tool can be reshaped using the Pencil or Direct-Selection tool. This is all fairly easy, but forms the basis of a great deal of Illustrator's core functionality and flexibility.
|
|
To choose settings for the Paintbrush
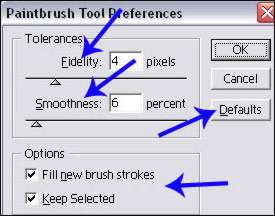 To choose paintbrush settings, double-click the Paintbrush-tool from the toolbar (or choose the tool and then press Return/Enter). The Paintbrush-Tool Preferences dialog box will pop-up. To choose paintbrush settings, double-click the Paintbrush-tool from the toolbar (or choose the tool and then press Return/Enter). The Paintbrush-Tool Preferences dialog box will pop-up.
Take the time to look at the dialog box. Under Tolerances you have two choices; Fidelity and Smoothness. Choose a Fidelity value, the range is from 0.5 to 20. A Fidelity value below 5 will produce a path very close to the way you drag the tool. A high setting will produce a smoother path with fewer anchor points that only approximates the path you drag. Choose a Smoothness value, the range is from 0 to 100. The Smoothness value is a measure for the amount of curvature the tool creates in the path. The higher the Smoothness, the fewer the irregularities in the path.
At the bottom of the dialog box are two options; Fill new brush strokes, and Keep Selected. Check the Fill new brush strokes box if you want new paths to be filled with the current fill color. Check the Keep Selected box to keep the newly drawn path selected. If you would like to return the dialog box to default status, then click the button on the right hand side directly underneath the Cancel option. Click OK or Return/Enter and the dialog box closes.
|
|
To remove a brushstroke from an object
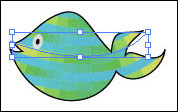 Select the object(s) that you want to remove the brushstroke from. I am using a fish. Select the object(s) that you want to remove the brushstroke from. I am using a fish.
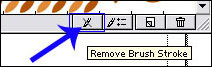 Open the Brushes palette, if not already visible on your artboard. From the Brushes palette click the Remove Brush Stroke icon located at the bottom of the dialog box. It is the icon with the diagonal line drawn through it. Once you have removed the stroke you are left with a path and nothing else. Open the Brushes palette, if not already visible on your artboard. From the Brushes palette click the Remove Brush Stroke icon located at the bottom of the dialog box. It is the icon with the diagonal line drawn through it. Once you have removed the stroke you are left with a path and nothing else.
|
|
To apply a brushstroke to an existing path
From the main menu bar select Window > Show Brushes, if not already open to open the Brushes palette.
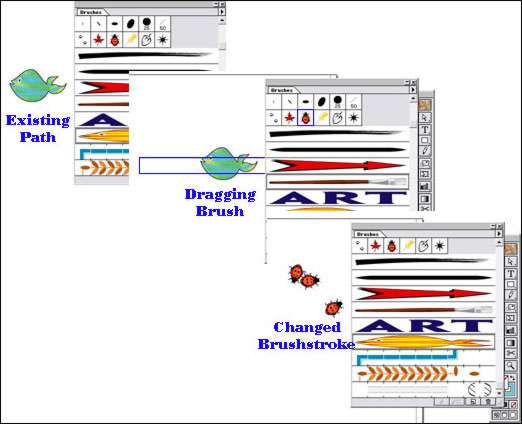
The brush I have on my artboard is a fish, and I will change my brushstroke into a ladybug scatter brush. Now drag the ladybug brush onto an existing path of the fish. The path does not need to even be selected beforehand. Release the mouse when the hand pointer is directly over the edge of the object. Another way to do the same thing; select a path of any kind (except a type path), then click a brush on the Brushes palette. A type path won’t accept a brushstroke, but you can convert type into outlines and then you can apply a brushstroke to the outlines. |


