Drawing a Paintbrush with Illustrator
This tutorial was done in Illustrator 10, but it should also work with version 9. Versions before that, I don't know because I don't have any version before 9, so if you try it with a previous version and it does work, please email me with the version number of Illustrator and any changes you had to make to get it to work. Thanks!
Before we start, change your units preferences to pixels by going to Edit > Preferences > Units and Undo. Set General to pixels in the dropdown list. You can work without doing this, but if your preferences are in inches, make sure you type "360 px" or whatever (without quote marks) and not just "360" or Illustrator will assume you want a 360" (or point or pica or whatever) image. Since I'm making this image for the web, and not print, I'm working in pixels.
|
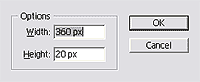
Step 1. First we'll build the brush handle. Highlight the ellipse tool in the toolbox, then click once on an empty area in your workspace or document. When the ellipse options dialog box appears, fill in 360 px for the Width and 20 px for the height. Click OK and an ellipse is created for you. |
 |
 |
|
Step 2. Change the fill to gradient in the tool bar by making sure the fill (the solid square) is activated by clicking it to move it to the front, and then click on the small gradient square underneath it. Activate the stroke by clicking it and bringing it to the front, and then click the null button (the little white square with the red slash across it next to the tiny gradient button.) The ellipse fills with the default gradient, which doesn't look anything like a brush handle so we have to edit it. |
 |
 |
|
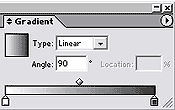
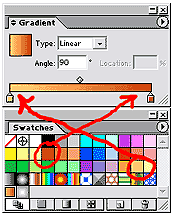
Step 3. Locate the gradient palette. Illustrator palettes can be moved around so if you don't see it, go to window > gradient to bring it to the front. Click on the two tiny arrows by the word Gradient on the tab to expand the palette. Leave the Type at Linear and change the angle to 90 |
 |
|
Step 4. Locate the swatches palette. (Window > Swatches) Grab the brown swatch (circled on the left) and drag it to the gradient palette and drop it on the right (dark) gradient stop (little crayon under the gradient). The brown becomes the dark gradient color. Now grab the pale orange swatch (circled on the right) and drag it to the left, or light colored, gradient stop, and the light color of the gradient becomes pale orange.
Your brush handle is updated automatically with the new gradient. Definitely looking better!
|
 |
 |
|
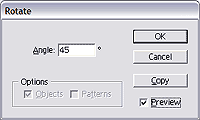
Step 5. To complete the brush handle, rotate it 45°. To do this, double click on the rotate tool in the toolbox to open the rotate options dialog box. (If you click on the artboard as we did to open the ellipse options, you will set the center of rotation for the handle to wherever you clicked. That's why this one opens with a double click of the tool.) Enter 45 in the Angle box, and if you tick the "preview" box you can check the rotation.
Click OK to return to the artboard and close the dialog box. |
 |
 |
|
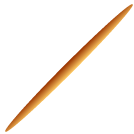
Step 6. Here's the rotated handle, shown at 50% size. Notice how pointed it is on both ends? We want to make the bristles fit better (after we build them!) so click on the knife tool (it's with the scissors tool in the toolbox. Left click on the scissors tool, and a flyout will appear with the knife tool in it. Slide the mouse to the knife tool, and let up on the mouse button. The active tool is now the knife, and your cursor turns into a knife. Select the brush handle, and then click on the knife tool to activate it. Run the knife cursor across the end of the brush handle at a 45° angle just a bit from the end to square off the end of the handle. Press V to get the selection tool back, click once on the artboard to de-select everything and then click on the tip we just cut off to select it, and drag it away from the rest of the handle and delete it. |
 |
|
|
|
|
knife tool |
tip |
|
Step 7. Now our brush has a blunt end we can attach bristles to, but what happened to our nice gradient? We'll fix that next. |
 |
|
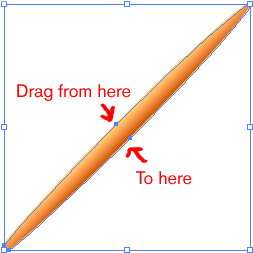
Step 8. Choose the Gradient tool in the toolbox (kb shortcut G). With the brush handle selected, drag the gradient tool across the center (the short way) at a 45° angle. Since we rotated the handle at a 45° angle, center mark to center mark is a 45° angle as well, so drag from the top one to the bottom one, as in the illustration to the right, to restore the gradient to the correct angle. Now we have a handle, let's move on to part two and make some bristles.
|
|