首页

PS教程

PSD素材

PS素材

背景图片

高清图片

字体下载

矢量素材

PS资源

PS作品

会员专区
注册 / 登录
收藏
入门教程照片处理抠图教程调色教程文字特效经典合成鼠绘教程滤镜特效非 主 流GIF 动画签名溶图创意设计
 您当前的位置: PhotoShop资源网 >> PS教程 >> PS教程 >> 创意设计 >> 正文

Drawing a Paintbrush in Illustrator

[ 作者来源:northlite.50megs 编辑整理:PhotoShop资源网 更新时间: 2006-08-03 录入: 黄叶飞扬 ]

Constructing the Bristles

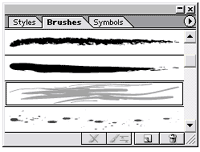
Step 9. The bristles are a simple brush stroke, so make sure nothing is selected on the art board by clicking in an empty spot with the selection tool (black arrow). The next step is to select the paintbrush from the toolbox (KB shortcut B). Open the brushes palette (Window > Brushes or F5 on the keyboard). Click the tiny arrow on the right side of the top of the brushes palette and make sure "Show art brushes" has a check mark by it. Scroll down to the bristly looking stroke like the one I have selected and click on it to select it. In your color palette at the bottom of the toolbox, change the color of the stroke to brown and the fill to none. (If you aren't using Illustrator 10, you won't have the Symbols tab.)

按此在新窗口浏览图片


Step 10. Draw several curved strokes with the brush, so you have something similar to this. Select all of them by drawing a marquee around them with the selection tool. Then go to Object > Arrange > Group. You may notice that the bristles are paler than the brown color you have for the stroke...that's the nature of this particular brush so that's normal.

按此在新窗口浏览图片


Step 11. It's nice, and looks like bristles, but the top, where it attaches to the brush handle, is a bit wild. We'll make a clipping mask to tame it a bit and control the shape. Select the pencil tool from the toolbox (KB shortcut N Why? I haven't a clue!). This next part will be easier if you set the pencil tool preferences a little different than the default. You can change it back later, if you want. Double click on the pencil tool in the toolbox, and the pencil options will open. Uncheck "Keep selected" and "Edit selected paths". This will allow us to draw two paths that touch but will stay as two paths so we can join them the way we need them to be joined.


Step 12. Draw a smooth curved path like this one:

按此在新窗口浏览图片

Step 13. Draw another one under it to complete the curve. Actually they should be very close together so you can match up the edges.

按此在新窗口浏览图片

Step 14. Move them very close together, if need be.

按此在新窗口浏览图片

Step 15. Use the lasso tool (KB shortcut Q) and draw a lasso around the two open ends on the left side of the two open paths, and then go to Object > Path > Join, or type Cntl/Command+J to join them. Repeat the procedure with the two end points on the right side of the paths. Now you have one path, which we'll use as a clipping mask.

按此在新窗口浏览图片


Step 13. Position the new clipping mask we just made over the bristles we did earlier. Keep in mind that whatever is outside the clipping mask won't show, so position it where you get the best shape for the bristles inside the mask.

按此在新窗口浏览图片


Step 14. Draw a marquee with the selection tool (black arrow) around the clipping mask and the bristles to select them. Your clipping mask is on top, and the bristles should still be grouped from Step 10.

按此在新窗口浏览图片


Step 15. Go to Object > Clipping Mask > Make. The area outside the mask become invisible. As you can see from the paths to the right, it's still there, you just can't see it.


按此在新窗口浏览图片

Deselect by clicking on an empty part of the art board, and you can see the shape of the bristles. Now we can move on to part three and make the metal collar that holds the bristles to the brush, and put it all together.

按此在新窗口浏览图片


≡★ 免 责 声 明 ★≡

除本站原创外,本站所提供的所有教程均收集整理自网络,其版权归该教程直原始作者或原始出处所有!

除特别声明外,您可以在保持教程的完整和注明来源的前提下免费复制、转贴本站所提供的所有教程;但是,不可以盗链本站的图片!

除特别声明外,在未经许可的情况下您不得将本站所提供的任何教程(包括资源)用于商业用途;

如果确有需要,请自行与该教程的原始所有权者(即:原始作者或出处)联系,本站不提供相关服务;否则,由此而引发的一切后果由您自负!